Search This Blog

Wednesday, June 11, 2014

If You Give a Mouse a Cookie....Apparently He Will Build a Giant Nest in My Travco!

This is more disgusting than the dead birds, both of them put together.  After finding some small mouse nests in the passenger side walls and ceiling we figured what the hell, take it all down.  It's a good thing we decided to because behind the other wall was the biggest mouse nest I have ever seen.  I ripped the wall out and started to pull it away, it was stuck on real good with liquid nails or something because it did not want to come down.  After only a few busted up knuckles I got it off in only two pieces.   I'm no baby but this made me gag, real bad.  I can handle all kinds of stuff but this put me over the edge.  It was all good until I started knocking the mess down with a broom, that really stirred up the stink.  I'm taking a little break right now to catch my breath.  Oh and by the way I was wearing a face mask, one rated to filter chemicals.  Yeah, it was that bad, but it could have been worse, at least I haven't found any dead mice.....yet.

That is so much mouse.

VURPPPPPPPPPPPPPP!

Tuesday, June 10, 2014

Mostly Gutted

#1 Door lock

Some Pictures of the Demolition

Notice the nicely sanded wall...it only took THREE days.  So much nasty brown paint and shiny shellac. It's all gone now though.  I am going to finish it with a light blonde stain and satin finish.

These walls were originally staying but I found some water damage under the window and upon further inspection found lots of smelly mouse nests.  Walls were definitely coming down after finding that.

We took down the cabinets and found another dead bird.  It didn't smell until I picked it up, the stench of death was so horrible.  There was nothing dead in the bottom cabinets, so that was a plus. 

The bird was in that section to the right where the wires ran through.  I can't really figure out how a robin managed to get up in there, must have been through the 2 inch space behind the counter top.     


Monday, June 2, 2014

Little by Little, Piece by Piece...

So, the weather finally doesn't stink and work has resumed on Rosie. 
#1 -Our door handle didn't work and there were no keys so I thought I'd order a new door handle...not so easy.  Apparently, it has been discontinued and if you find one that has been refurbished on Ebay it's big $$$.  So I decided to take the one we have apart and fiddle with it to see if I could at least get it working.  Low and behold after dismantling it I discovered that the springs were still good and it just need to be realigned.  Yay!  From my previous research I saw that new lock tumblers and keys could be ordered and began my new search.  O.K. so not the best solution but these particular door handles can be opened with keys that do not belong to it.  I am not really worried about the security because it also has a deadbolt and decided to go through my "old key bucket" and after a little bit of trial and error found a set that worked.  Fixed for 0$.  Awesome!

#2 -She won't start. Hubs is working on it.  Getting frustrated but working on it.  He has replaced the coil and ballast resistor.  Next up is new cap, rotor, plugs, wires etc... full tune up.  It ran great, sat for about 4 weeks and cranks but won't start.  There was a fair amount of mouse/squirrel poo on the motor so we're are not ruling out rodent sabotage.

#3 -I thought that the dark brown paint and super shiny shellac that had been put on most of the woodwork was pretty darn ugly so I figured I'd just strip and sand it easy peasy.  What a pain in the butt.  I started with the wall outside the bathroom.  It has taken much longer than anticipated.  I finished it (mostly) today and will hopefully be able to stain and seal it tomorrow.  I want it a light blonde color to go with my mid century theme.  The rest of the woodwork, cabinets and around the fridge and closet will be sanded and painted to lighten everything up.  I will be starting that project by the end of the week.  I also took the wood off the inside of the front door and will be making a new piece that will look a little nicer.  Pics to come tomorrow.

Monday, March 3, 2014

Long Haul for Some Wheels

 So we are back from our vacation in sunny Florida.  Being that the 19 inch rims are fairly hard to come by we had to drive all the way to Florida to get some.  To be honest we were headed there anyway and it was only a 30 min. drive from our resort so in order to save a bundle on shipping we opted to pull a trailer all the way down I95 south.  I had a sort of "trial by fire" as I took the first driving shift and maneuvered the truck and trailer through Friday 5:00 rush hour traffic on the Cross Bronx expressway and over the George Washington Bridge.  I would say I did pretty good for my first time driving through NY city.  Anyway, halfway through our 2 week vacation we took a day off from the parks and headed into "real" Florida to get our rims.  They spent the rest of the week strapped to the trailer in a dirt lot next to the resort.  Funny how they didn't want a trailer full of old wheels and rotten tires sitting in the resort parking lot. lol.  We made it home along with all 5 wheels in just about 23 hours.  Orlando to Cape Cod is a looooooonnnnnggg haul and somehow we made it a personal best time.  Now to search for tires....

Tuesday, February 4, 2014

Winter is ...just...dragging....on and on and on....

So Rosie has been parked...under a tarp for the past few months.  We never got to fully seal the roof stuff we took off because the temperature dipped too low.  So under a big blue tarp she went until the warmer weather prevails.  We are taking a little (1300 mile) road trip to get her some new wheels in a few weeks. So until the Springtime weather makes an appearance I will just have to occupy myself picking out colors and fabrics and paints oh my!

Monday, October 28, 2013

A Little Primer and Some Paint...

So, Dave and I spent an entire weekend priming and painting this beast.  Probably an overly ambitious job for newbies.  We had almost no idea what we were doing.  I followed all the directions on the paint, gun etc... The weather was pretty nice 65 and sunny with only the occasional gust of wind.  All should have gone well.  In the end after HOURS of back breaking work it is all one color but the finish is rough.  :(  I was really disappointed with the roughness of the finish almost sandpaperish.  By the time we finally finished it was dark and we were freaking tired, absolutely exhausted!  Dave stopped by during the week after work to get a look at her in the daylight and assured me it wasn't as bad as I thought.  It took me a full week to get back over to the farm to check it out.  It looks less rough now and the sheen is almost pearl but not shiny. I have done some more research and believe the paint job suffers from "dry spray".  Apparently the paint  was drying too fast as it was being sprayed.  This is also evident by the amount of paint dust that is completely covering the RV.  The area that we wiped down looks even better without the dust on it.  I think the verdict is I am going to try to wet sand it with a very high grit paper and buff it.  Hoping this will fix it up.  I really don't want to paint anything else except for the stripe in the Spring.  The all white is way too white right now she definitely needs a spot of bright color.  We didn't take many pictures due to the hazmat suits we were wearing and we were working non-stop all weekend.  I did take a video when I visited this Saturday.  The wind was ripping across the field so the sound is terrible.  The gusts were so strong the wind took the big barn doors when Dave was closing them and smashed his wrist.  I can't believe it wasn't broken! 


Primed and ready!


I charged the battery and got some pics of her all primed with the Slick Sand.  Although I did like the product it took forever to sand the entire thing again.


Wednesday, October 16, 2013

Prep and Sanding

Dave and I have spent the last 2 weekends prepping Rosie for paint.  Anyone who has done this realizes what a labor intensive project this is.  I have personally sanded 27 feet of RV 3 times.  While I was killing myself sanding Dave took off everything that would come off and carefully masked and taped everything else.  He is an excellent mask and taper by the way.  I realize that I could have, probably should have sanded more but that last go around with 320 was all my sanity could handle.  I did my best to make the poor fiberglass repairs less noticeable and am sure someone with OCD and more experience could have done a better job.  The roof is what it is, it doesn't leak and you can't see it from the ground anyway.  That said we were able to get the http://www.evercoat.com/productDetail.aspx?pID=28  Evercoat Slick Sand sprayed on yesterday.  It took a bit to get the spray right and we reduced it by about 10% with acetone to get it to flow out of the 1.8mm tip.  Once we got going it went pretty smoothly.  At one point the wind picked up but not for long so we were good.  This stuff is thick and dries fast so you need to work as fast as possible.  If I were to do this again I would have cleaned the gun out halfway through.  That being said it took a bit to get the gun completely cleaned out when we were done. Persistence prevailed and it will be good to go with the primer next weekend.  Because I have a hard time waiting I did a little "test" sanding on the grill piece that was painted first and dry enough by the time we finished with the rest of the RV.  This Slick Sand is amazing!  It fills in all sort of pinholes, scratches etc...and sands so easily.  In minutes I had the piece smooth as can be with 320 grit.  I think I may go over the whole thing with 320 and then follow up with 400 if it goes as easy as the small piece.  In an earlier post I said we were going to use Sherwin Williams paint but we went with Eastwood instead.  They were super "do-it-yourself" friendly and the tech support was great! 

65 degrees, no bugs and only a small wind issue.

All suited up in the appropriate safety gear. The camera battery died so I will update with pics of her primed next week.

Monday, October 7, 2013

In the Barn

Dave drove Rosie to Little Compton, RI and said it was smooth sailing all the way!  He cruised down the highway at 65 - 70 mph with no problems.  I took a car load of kids with me in the Tahoe filled to the roof with sleepover gear and tools.  The kiddos played on the farm while Dave pulled off whatever he could and I sanded the old latex house paint.  Luckily, the PO only managed to paint about 1/3 of the beast so it wasn't that bad.  Unfortunately, Sunday started out rainy so we pulled her into the barn and closed up shop for the weekend.  I am  hoping the weather cooperates and I can get over there to sand on Wednesday.  I would love to get some primer on over the holiday weekend.  A trip to the paint store is also scheduled for mid week.  We will be traveling a few miles to the Sherwin Williams Automotive Paint supply store.  We chose SW paint because we have no idea what to buy and need advice from the guys at the store plus it is the only automotive paint supply store I could find in the area.  Farmer Fred needs a special shout out for letting us put this "beast" as he calls it in the 200 year old barn.  Thanks Fred!
After a long hard days work...Dave and I relaxing on the swings.  The "beast" is looming behind us lol.

She looks like she'll fit....


Like a glove...not much room lengthwise.


From the hayloft.


Friday, October 4, 2013

More is not always better...


So, I have spent a better part of the week pulling decades ? old silicone off from around the windows.    Removing it was tedious work, there was a lot of it. My fingers are a mess, I did not follow directions and wear gloves, it was too hard to get the stuff smooth with them on.   The black stains should wear off...eventually.  I am trying a marine based non silicone product called 3M 4000 UV fast cure adhesive sealant.  I went the "less is more" route so we'll see if that improves the situation any. I guess I can find out when it's cured. The hubs also tore out some wall board and the ceiling material on one side just to see what's under there.  It looks alright, nothing scarey.  I think he also has gotten a better idea of what wire goes where so he can do some electrical work while it's off also.
-Day 4ish- The caulking has cured, we tested it with the hose and NO (major) LEAKS!  Yay!  I am so excited.  There was only one small drip that was easily fixed in about a minute.  FYI- the product I used is fantastic.  So easy to work with, goes on easy and is smoothed down nice and flat with a finger dipped in water.  I know that on the reviews people suggested that it should have come with a cap so you didn't have to use it all at once.  I stuffed a nail in the hole and wrapped it in tape.  It was good to go the next day.  Check out the pics and video where ummm, like I use that ummm word way to much ummm, like yeah. 
We are also starting to prep for painting.  Dave was stuffed under the dash so he could reach the nuts on the back of the bolts holding on the handles on the front and he got so stuck!  I took a video instead of helping right away and it would have been hilarious except I didn't hit the record button...dummy.  Anyway, I posted the video I took of him extracting himself from the situation.  You've got to keep a sense of humor in a project like this.

Not sure why this uploaded sideways...anyway this is the hubs "acting natural".

globbed on silicone...

What a mess!

What we found.


The windshield is a mess.  It really needs to be replaced, at least the passenger's side and the gaskets.  It is just not in the budget at all at this point.  So I am playing Macgyver and using some rubber hose and the 3M stuff to fill all the gaps from shrinkage.  The stone bruise in the glass should be repairable by a glass company for now.  I have my little carved rubber pieces in place with sealant and tape until it cures.  I will then clean it up and blend it with a razor knife and more sealant.  A little goes a long way with this stuff which helps keep it nice and neat looking.
This is the windshield....you could practically drive a bus through this gap!


Wednesday, September 25, 2013

Walk-through

I should  have made this video before we started taking stuff apart...but I didn't.  You can still get an idea of what Rosie looks like right now.  There is a bunk bed couch but I already took out the bottom seat.  The floor is just plywood that the PO polyurethaned.  I did  find bits and pieces of some lovely orangy-yellow shag carpeting stuffed up under the woodwork... the green they put in was not an improvement.  We also found many feathers and an entire bird stuffed halfway up the duct-work for the heater...which explained most of the smell.  The smell also seems to  improve with each bit of upholstery we remove.  Bleaching the water tank helped too.  Once she comes back from the mechanic we are driving her to Little Compton RI to spend the winter in a nice big barn.  We are hoping to get her painted within the next couple of weeks if the weather cooperates.  I am going to get to work on all the upholstery over the winter at the house to avoid any mousy damage.  It's a big job but I think if we tackle it piece by piece we won't go totally insane.

"Exhausting" Manifold Business...

Just got off the phone with my new fav. mechanic...he has a sense of humor, is not afraid of the tough stuff and thinks Rosie is the coolest. Well, maybe not anymore.  It seems it took forever to get the manifold off and he still has to drill out some super stuck bolts.  His words, " this was the toughest job I've ever done."  Great.  He is on the hunt for a gasket and assured me that barring any new unforeseen issues we should get her back by the weekend.  I haven't even asked the price yet...to be honest I'm a little scared.

Thursday, September 19, 2013

My little cutie and Soft Bear...he goes everywhere!

I am posting this purely for the cuteness factor...It was love at first sight when Cassidy saw the Travco.  She may be the most excited of us all, you can tell by the ginormous grin.   She and Soft Bear cannot wait for the first road trip!

Saturday, September 14, 2013

The Wheel Hunt Continues...

We finally found some 19.5 inch rims to replace the old split rims on the rear duals...or so we thought.  After scouring the Internet searching high and low we found some on a junk 3 towns over.   The hubs, our son and myself headed out early to meet a guy about some wheels in Hixville.  We meet up with Manny, pile into the "yard" car and head out through the junkyard.  Yay!  They're there....and we pass right by them.  Manny says those are sold but he's got more around the bend.  By now I'm practically an expert on these wheels and can tell before we even get out that they are not the right ones.  Six bolts, not five.  Ugghhh!  Manny apologizes and say he'll keep a lookout for some.  All is not lost though we do head home with some pretty sharp stainless wheel covers at a price that can't be beat.  Plus Manny was a real funny guy, we'll definitely keep him in mind if we need something else.

Friday, September 13, 2013

Glitch of the Day and a Name!

So we went to move the Travco to my parents much larger driveway in anticipation of the new shoes she'll be getting this weekend and...nothing.  Hubs said it sounds like no spark, checked the coil first and guess what?  Nope, they shouldn't be leaking oil.  A 5 minute trip to the auto parts store and $28 had her fixed in a jiffy.  The funny thing is on the drive over while watching her roll down the street I came up with her name...Rosie!  It's perfect.  Her interior is getting redone in a mid century modern theme...think the future but from the '50's.   Rosie is the name of  the robot housekeeper from The Jetsons...Perfect!


How we found her.

This is shortly after we picked up our "new" 1972 Dodge Travco.  What? you've never heard of one?  Look it up, they have a really cool history.  The hubs knew about them, the hubs had secretly been watching them on Ebay, the hubs bought it ....by accident!  He put in a bid that he was sure was not going to be the highest but low and behold 6 days later we were driving her home.
                                                                         

Yes, that's gen-u-ine Naugahyde.

It's all there and everything (mostly) works!

Love the bunks for the kiddos.
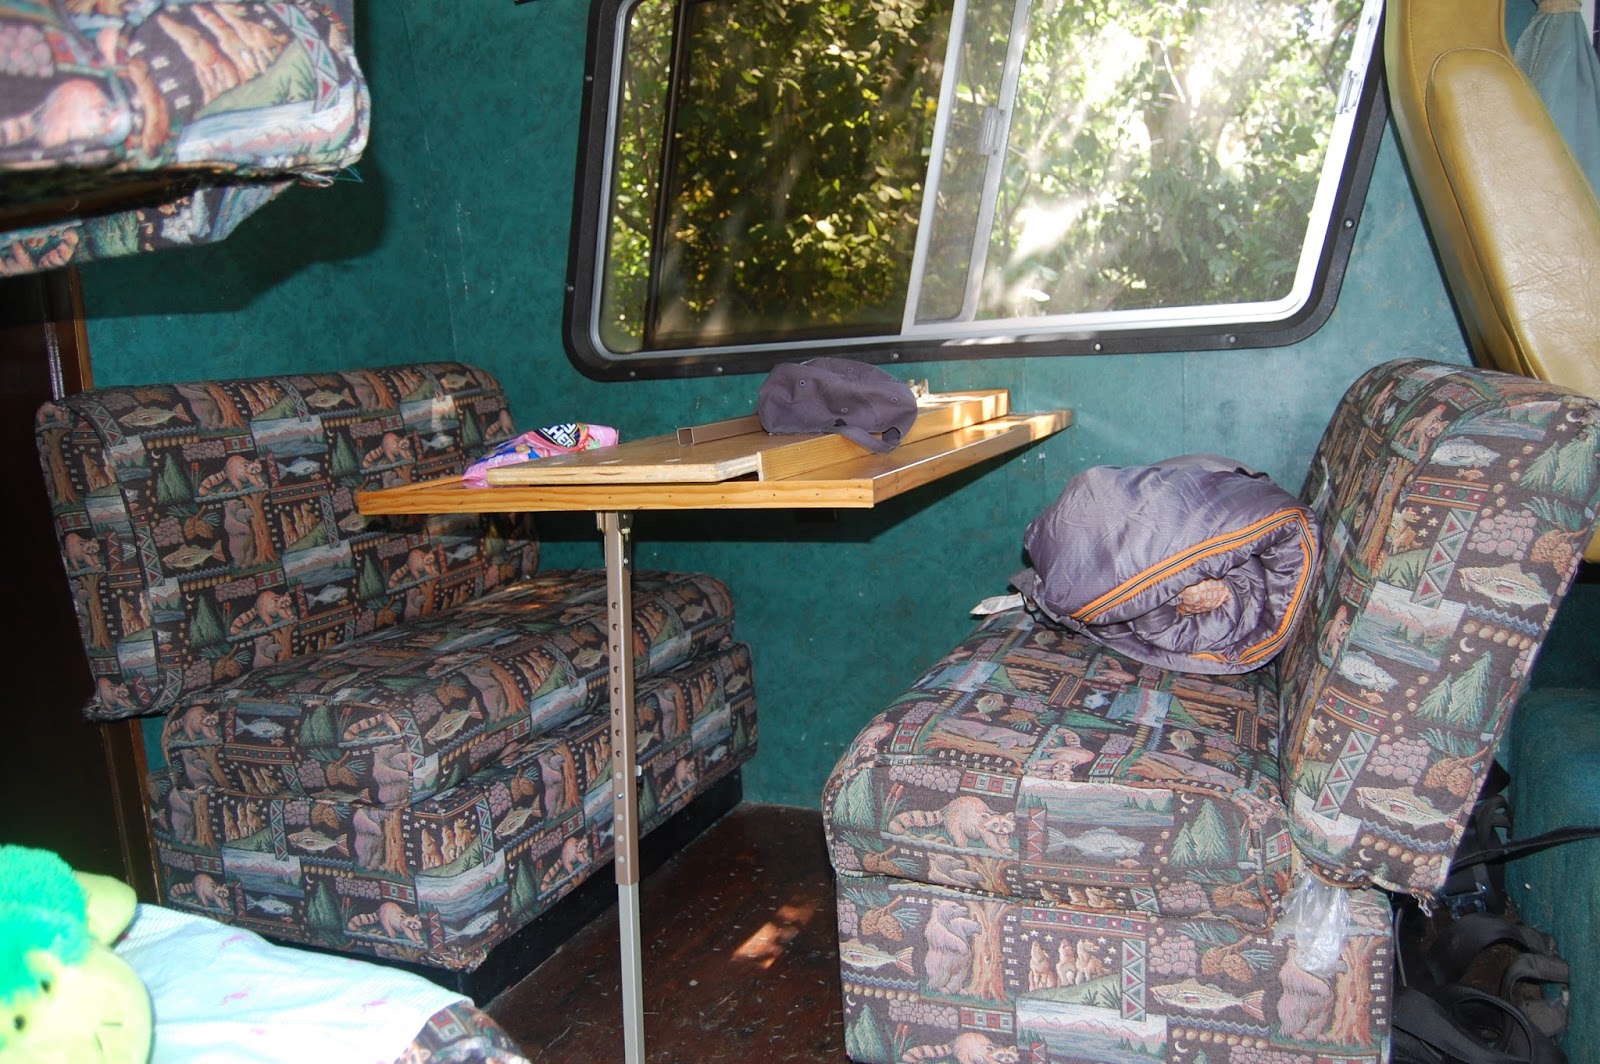
Don't love the wilderness inspired upholstery...

Psyched about all the storage, fridge and oven that looks like it was never even used.
 So after she arrived (no name yet) we looked her over and started cleaning, and then we cleaned again and then guess what?  Yup, more cleaning.  The mattress was first to go, the upholstery is next.  Not bad overall, she starts right up and drives so that's a bonus.  

The bathroom is pretty roomy with a real shower.

The paint needs to go...note the drunken red housepaint stripe.

Th
This is so cool!

The more I look at her the more I like her.
So this is what you get for 3 grand on Ebay.  A classic!  Vintage 
at it's best.  You can't see it?  You will...we can already.  
She needs work... a lot of work.  We're not afraid, it's an adventure.

My favorite part is her nice round butt!